

T: +86-20-86973099
E: sales@xqglasses.com
E: sales@xqglasses.com
NO.3, Yongfu Road, Sandong Avenue West, Huadu District, Guangzhou City, Guangdong Province, China
Views: 0 Author: Site Editor Publish Time: 2026-06-22 Origin: Site


Improperly fitted eye protection severely compromises your field of vision out on the track. It frequently causes sudden lens fogging. It also creates dangerous visual distractions at high speeds. Many riders incorrectly assume poor performance stems from basic user error. In reality, it often reveals a fundamental structural mismatch. The product frame simply does not align properly inside the helmet eye-port. Mastering the correct application technique forms your critical first step. Using this procedural baseline helps you accurately evaluate your equipment. You can determine whether your current setup truly works for your specific facial structure. Let us explore the vital transition from proper application methods to assessing structural product compatibility. You will learn the exact evaluation criteria needed to confidently decide when to replace your gear. Protecting your eyes requires absolute geometric harmony across your entire headgear system.
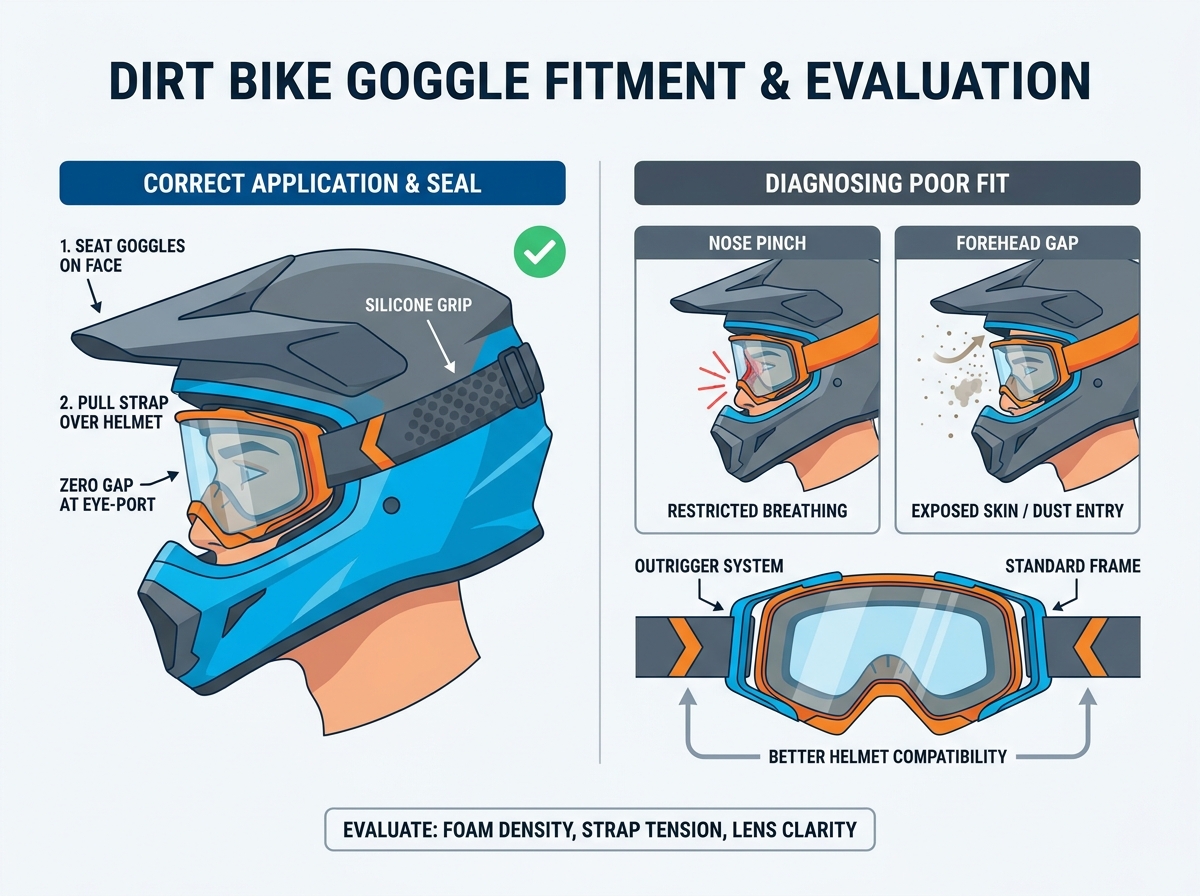
Correct application involves securing the helmet first, utilizing the strap’s silicone backing for grip, and ensuring zero gap between the helmet eye-port and goggle foam.
Persistent nose pinching or forehead gaps usually indicate a hardware mismatch, requiring helmet compatible goggles designed specifically for your helmet brand or shell size.
A well-adjusted dirt bike goggles strap should provide even tension without pulling the frame off the face or distorting the lens.
Evaluating new dirt bike goggles requires looking beyond aesthetics to functional metrics: outrigger presence, foam density, and lens retention systems.
We see riders apply their gear incorrectly every single day. They frequently stretch the frame over the helmet chin bar. They pull it down roughly over their exposed eyes. This careless method ruins expensive equipment rapidly. It damages the delicate facial foam over time. It also severely compromises your crucial sweat seal. You must adopt a proven, sequential method instead. This deliberate process protects your financial investment. It guarantees maximum safety and visibility on the track.
Follow these exact steps for proper application every time you ride:
Secure the helmet entirely: Fasten your chin strap completely before you even touch your eyewear. Your helmet must sit securely in its final riding position. Any later shell shifts will pull the eye protection entirely out of alignment.
Seat the facial foam: Pull the frame directly over your face. Seat the soft foam gently against your cheeks and nose first. This establishes your primary dust seal. You want the lower section resting comfortably without restricting your nasal passages.
Position the strap carefully: Pull the elastic band back over the helmet. Keep it high on the shell initially. Do not drag the plastic frame downward across your sensitive face. Slide the band into the designated groove at the rear to create perfectly even tension.
Never leave your eyewear strapped around the chin bar. Never pull them down into the eye-port from above. This lazy technique rolls the foam edges backward. It invites flying dust and roost directly into your eyes. Proper application requires intentional, careful movements. Using high-quality Dirt Bike Goggles only matters if you put them on correctly.
You applied your equipment correctly using the steps above. Now, you must determine if any remaining discomfort is structural. Sometimes, procedural adjustments cannot solve the underlying problem. You might need a complete hardware upgrade. Recognizing the difference saves you significant time and frustration. It also keeps you much safer during aggressive rides. Achieving the ideal motocross goggles fit prevents dangerous mid-air distractions.
Pay close attention to these three common structural symptoms:
Symptom 1: The "Nose Pinch." Does the frame restrict your breathing? This happens frequently after proper application. It means the chassis is simply too tall. Your helmet eye-port pushes the top edge down aggressively. This forces the lower frame directly into your soft nasal cartilage. You cannot fix this issue through strap adjustments. You need a physically shorter frame design.
Symptom 2: The "Forehead Gap." Exposed skin between the helmet brow and the frame is highly dangerous. It invites heavy roost, mud, and dust directly into your eyes. This gap indicates a structural curvature mismatch. Your unique facial structure does not align with the product shape. Alternatively, your helmet shell shape pushes the frame away from your forehead. You need a different brand or a specialized shell size.
Symptom 3: Persistent Fogging. Many riders immediately blame the factory lens coating. However, persistent fogging often highlights severely compromised airflow. An overly tight fit crushes the vital top ventilation foam. This traps hot air and sweat inside the chassis. Structural mismatch causes uneven pressure across your face. This destroys the necessary airflow dynamics required for clear vision. You must match the frame width to your specific helmet opening exactly.
Your strap tension dictates the overall performance of the entire unit. The elastic band holds the complex system together. It manages the delicate balance between environmental sealing and physical comfort. Poor tension ruins the best equipment instantly. You must understand the functional mechanics behind this simple component.
A proper dirt bike goggles strap requires highly precise adjustment. It should compress the first layer of soft face foam completely. It must never crush the secondary rigid foam layer. Over-tightening causes severe optical lens distortion. It warps the plastic frame over time. You will experience pounding headaches on long trail rides. Conversely, if it is too loose, the unit bounces violently over bumps. Adjust the plastic slides in very small increments.
Most modern bands feature thick silicone beads on the inside surface. You must ensure these beads sit perfectly flat. They must press directly against the hard helmet shell. Twisted bands eliminate this crucial friction entirely. The unit will inevitably slide down during a rough race. Run your fingers along the entire band after installation. Smooth out any folds or twists immediately.
The band must always sit in the designated rear helmet groove. Every off-road helmet features this specifically molded channel. This channel pulls the chassis straight back into your face. Pulling up or down changes the sealing pressure dynamics entirely. An upward angle lifts the nose piece away from your skin. A downward angle crushes the forehead foam uncomfortably. Proper geometry ensures consistent, comfortable pressure all day.
Upgrading your gear requires understanding different structural designs. Manufacturers use two primary engineering approaches today. You must compare them carefully before evaluating a new purchase. The wrong choice will recreate your previous fitment issues.
Standard frames represent the traditional, classic design approach. The elastic band attaches directly to the main plastic chassis. They are generally much lighter. They cost significantly less than complex modern designs. However, the band pulls directly from the outer lens edge. This backward force often causes the frame to lift off your face sides. Wide modern helmets exacerbate this lifting problem significantly. You lose the side dust seal completely.
Outrigger frames feature extended plastic arms on each side. These outriggers push the strap attachment point forward. They move the pulling force away from the lens plane entirely. This creates a much wider angle for the elastic band.
Outrigger designs remain fundamentally superior for most modern riders. They help you achieve true helmet compatible goggles across wildly varying shell sizes. The forward attachment pulls the chassis evenly into your face. It ensures perfect pressure distribution across the entire foam shield. You eliminate dangerous side gaps instantly. We highly recommend outrigger models for modern, premium helmets. They solve integration problems effortlessly.
Below is the Frame Design Comparison Chart detailing the core structural differences.
Design Feature | Standard Frames | Outrigger Frames |
|---|---|---|
Strap Attachment Point | Directly on the main chassis edge | Extended forward on hinged arms |
Pressure Distribution | Often heavier on the forehead and nose | Evenly distributed across the entire face |
Helmet Compatibility | Best for narrower, traditional helmets | Excellent for wide, modern premium helmets |
Side Seal Integrity | Prone to lifting on the outer edges | Maintains a tight, consistent seal |
You must eventually move to the active decision stage. Perhaps your current setup completely failed the diagnostic tests above. What are your absolute baseline requirements for a qualified replacement? Do not buy new gear based on aggressive styling alone. You must look beyond aesthetics to evaluate actual functional metrics.
Focus strictly on these critical components during your search:
Foam Architecture: Look strictly for triple-layer, moisture-wicking foam. The first soft layer seals against your skin. The second porous layer absorbs heavy sweat. The third dense layer provides structural support against the plastic. Single-layer foam strongly indicates sub-standard, non-durable gear. It will break down rapidly.
Lens Changing Systems: Evaluate quick-release systems carefully. Compare them against traditional channel-lock lenses. Quick-release models suit variable light and thick mud conditions perfectly. You can swap tinted lenses in seconds. Traditional locks offer robust impact security but require much more physical effort to change.
Field of View (FOV): Massive FOV designs currently dominate the off-road market. However, you must note a major physical trade-off. Larger is never better if it does not fit the helmet eye-port. Massive frames often cause the dreaded nose pinch mentioned earlier. Verify physical compatibility before prioritizing maximum peripheral vision.
Take your specific riding helmet directly to a gear fitting. Try multiple brands on while wearing your actual headgear. Fasten the chin strap every single time you test a pair. Alternatively, order from trusted retailers offering frictionless return policies. You must verify physical eye-port integration safely at home. Never compromise on this vital piece of safety equipment.
Knowing how to put your equipment on only solves half the equation. The hardware must geometrically align perfectly. It must match both your unique facial structure and your specific helmet. Poor alignment guarantees a miserable, dangerous riding experience. You will suffer from constant fogging and severe physical discomfort.
Expensive gear remains absolutely useless if it fails to seal properly. Physical compatibility always trumps brand prestige. A cheap, perfectly fitted frame outperforms an ill-fitting premium model every single time. Trust your physical comfort over flashy marketing campaigns. Your eyes need genuine protection, not just expensive logos.
Assess your current setup immediately. Use the diagnostic steps outlined thoroughly above. Check for painful nose pinching and dangerous forehead gaps. Look for crushed ventilation foam around the top rim. Explore upgraded options today if your vision or comfort remains compromised. Protect your eyes properly, and enjoy your time in the dirt.
A: They always go outside. The strap goes around the exterior of the helmet shell, while the frame sits inside the eye-port directly against your face. Placing the thick band inside creates dangerous pressure points against your skull. It also completely breaks the necessary sweat seal.
A: They should fit snug enough to create a complete, uniform seal. This properly blocks incoming dust and roost. However, they must remain loose enough to prevent restricted nasal breathing or tension headaches. You should only compress the softest inner layer of the face foam.
A: Yes, but you must evaluate specific OTG (Over The Glasses) models. These specialized designs feature significantly deeper frames. They include side-notches in the plastic chassis. They accommodate your eyewear temples without applying painful pressure to the sides of your head.


